सर्दियों में नर्सरी तैयार करना किसी चैलेंज से कम नहीं है | अगर किसान को अपनी उपज का अच्छा दाम प्राप्त करना है तो उसे अगेती फसल उगानी होगी ताकि उसकी फ़सल बाकी किसानों से पहले मंडी में पहुँच सकें | इसके लिए नर्सरी भी अगेती तैयार करनी होगी | लेकिन जनवरी के महीने में तापमान रात को जीरो डिग्री तक पहुँच जाता है | ऐसे में नर्सरी कैसे तैयार करें ?
आज इसी विषय पर हम समझेंगे कि ऐसे कठोर मौसम में (सर्दियों में अगेती फसल की नर्सरी ) एक अच्छी उपज के लिए कम समय में नर्सरी कैसे तैयार करें |
सर्दियों में अगेती फसल की नर्सरी का बीज:-
नर्सरी तैयार करने का सबसे पहला चरण आता है बीज प्राप्त करना है, किसानों को अच्छी पैदावार के लिए हाइब्रिड बीज का उपयोग करना चाहिए ताकि फसल में पैदावार अधिक हो और बीमारियां कम से कम आए |
- सर्दी में बीज उगाने के लिए गुनगुना पानी ले उसको एक थर्मस या कोई ऐसा बर्तन ले जिस का तापमान लगभग 6 से 8 घंटे एक जैसा रहे |
- गुनगुने पानी में बीज डालकर थर्मस या बर्तन को बंद कर दें |
- लगभग 6 घंटे के लिए बीज को थर्मस के अंदर छोड़ दे |
- 6 घंटे के उपरांत किसी कपड़े की सहायता से पानी से अलग कर ले |
- बीज को किसी कपड़े के अंदर लपेटकर 1 से 2 दिन के लिए गेहू के भूसे या गेहूँ के ढेर के अंदर रखे | ताकि बीज का तापमान 15 से 16 डिग्री बना रहे |
- बीज को बाहर निकालने से पहले यह चेक कर ले क्या बीज का अंकुर स्टार्ट हो गया है अगर अंकुर बिल्कुल हल्का सा शुरू हो गया है या शुरू होने वाला हो तो बिना देर किए हुए उसे बाहर निकाले और प्लास्टिक ट्रे के या मिटटी के बेड के अंदर लगा दे |
- बीज हमेशा लेटी हुई (horizontal) अवस्था में ही लगाना चाहिए | बीज को लगाने के उपरांत ऊपर से हल्का हल्का कोकोपीट या मिटटी डाल दे |
- जहां पर भी हम बीज उगा रहे हैं उस जगह को प्लास्टिक की सहायता से कवर कर दें (low tunnel) ताकि वहां पर उचित तापमान बना रहे |
- अगर आपको लगता है प्लास्टिक की सीट लगाने के बाद भी तापमान कम है तो वहां पर 200 वाट का बल्ब या मरकरी लाइट का प्रयोग करके तापमान 15 से 16 डिग्री तक लेकर आ सकते हैं ताकि अगेती फसल का बीज को उगने के लिए उपयुक्त तापमान मिल सके |
मटका खाद बनाने की विधि मटका खाद(matka khad) के बारे …
सर्दियों में अगेती फसल की नर्सरी मीडिया:-
सर्दियों में अगेती फसल की नर्सरी तैयार करने के लिए किसान मुख्यतः दो तरह की विधि का प्रयोग करते हैं |
- मिट्टी के साथ :- इस विधि में किसान 8 से 10 इंच ऊंचाई व लगभग दो से 3 फीट चौड़ाई का बेड बनाते हैं | बेड बनाने के लिए बालू मिट्टी का प्रयोग किया जाता है | बेड बनाने से पहले बालू मिट्टी को छानकर उसमें एक तिहाई वर्मी कंपोस्ट मिक्स किया जाता है | मिटटी में बीज से पौधे लगभग 50% से 75% तक उगते है |
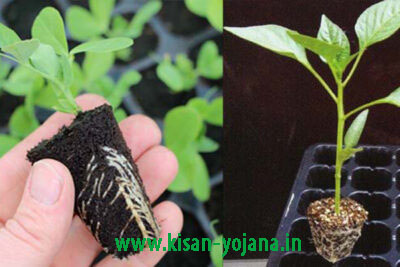
- मिट्टी के बिना:- इस विधि में किसान मुख्यतः प्लास्टिक की ट्रे के अंदर कोकोपीट, परलाइट कोलराइट व वर्मी कंपोस्ट के मिक्चर का उपयोग करते हैं | नर्सरी के लिए यह विधि सबसे उपयुक्त है क्योंकि इसमें पौधों को एक स्थान से दूसरे स्थान पर स्थानांतरण करना आसान और सुरक्षित है | कोकोपीट में बीज के लिए उपुक्त नमी बनी रहती है जिससे बीज से पौधे लगभग 80% से 95% उगते है | कोकोपीट मिक्चर में मिट्टी के मुकाबले नर्सरी में जड़ संबंधी बीमारियां कम आती है |
| मीडिया | मात्रा | |
| 1 | कोकोपीट | 60 से 70% |
| 2 | परलाइट | 10 से 15% |
| 3 | कोलराइट | 10 से 15% |
| 4 | वर्मी कंपोस्ट या गोबर खाद | 10 से 15% |
CVR soil तकनीक क्या है ? क्या मिट्टी के छिड़काव …
प्लास्टिक की ट्रे के लिए कोकोपीट मिक्चर कैसे बनाये ?
- सबसे जरूरी है कोकोपीट अच्छी क्वालिटी का खरीदें |
- कोकोपीट को 1 दिन के लिए पानी की बाल्टी या किसी बड़े बर्तन के अंदर रख दे ताकि कोकोपीट के अंदर मौजूद नमक व अन्य हानिकारक तत्व निकल जाए |
- कोकोपीट को बाहर निकालकर धूप में सुखा लें सुखाने के उपरांत मोटी छलनी से छान लें |
- केवल बारीक कोकोपीट को ही हम नर्सरी के लिए प्रयोग करेंगे |
- कोकोपीट में परलाइट, कोलराइट व वर्मी कंपोस्ट मिक्स कर ले |
- अब हम इस मिक्सर को नर्सरी के लिए प्रयोग कर सकते हैं |
- अगर आपके क्षेत्र में परलाइट और कोलराइट प्राप्त नहीं हो रहे हैं तो आप केवल कोकोपीट 80% व वर्मी कंपोस्ट 20% का प्रयोग करके भी नर्सरी तैयार कर सकते हैं |
- आप केवल कोकोपीट की सहायता से भी नर्सरी तैयार कर सकते हैं |
- क्योंकि कोकोपीट में कोई पोषक तत्व नहीं होते हैं तो हमें पोषक तत्वों ( डीएपी यूरिया पोटास ) इत्यादि पानी में घोलकर स्प्रे के माध्यम से नर्सरी में दे |
- पोषक तत्वों का स्प्रे केवल तभी करें जब पौधों में दो या तीन पत्ते या उससे अधिक हो|
कठोर मौसम में किसान अपने आसपास इंडो इजरायल प्रोजेक्ट सेन्टर से भी कम क़ीमत पर नर्सरी तैयार करवा सकते हैं इंडो-इजरायल सेंटर से संबंधित जानकारी नीचे दिए गए लिंक से प्राप्त करें |
https://centreofexcellenceforvegetable.webs.com/
How to preparing nursery in winter season ?
Preparation of nursery in winter is no less than a challenge. If the farmer wants to get a good price for his produce, then he has to grow the crop early so that his crop can reach the market before the rest of the farmers. For this nursery also has to be prepared early. But in the month of January the temperature reaches zero degree at night. So how to prepare nursery?
Today on this topic we will understand how to prepare nursery in less time for a good yield in such harsh weather.
पौधों के लिए सबसे अच्छी मिट्टी कौन सी है?
Seed:-
The first step of nursery preparation is to get the seeds, farmers should use hybrid seeds for good yields so that the crop yields more and diseases are less.
To grow seeds in winter, take lukewarm water, take it in a thermos or any such vessel whose temperature remains the same for about 6 to 8 hours.
Put the seeds in lukewarm water and close the thermos or pot.
Leave the seeds inside the thermos for about 6 hours.
After 6 hours, separate it from the water with the help of a cloth.
Wrap the seed inside a cloth and keep it inside a wheat straw or a heap of wheat for 1 to 2 days. So that the temperature of the seed remains 15 to 16 degrees.
Before taking out the seed, check whether the seed has started to germinate, if the seedling has started very slightly or is about to start, take it out without delay and inside a plastic tray or soil bed Put it
The seed should always be planted in the horizontal position. After planting the seed, put light cocopeat or soil on top.
Wherever we are growing the seeds, cover that place with the help of plastic (low tunnel) so that the proper temperature is maintained there.
If you feel that the temperature is low even after installing a plastic seat, then using a 200 watt bulb or mercury light, you can bring the temperature to 15 to 16 degrees so that the seeds can get the appropriate temperature to grow.
Nursery Media:-
Farmers mainly use two methods to prepare nursery.
With soil: – In this method, farmers make beds of 8 to 10 inches in height and about two to 3 feet in width. Sandy soil is used for making beds. Before making the bed, one third of the vermicompost is mixed in the sand soil after sifting it. About 50% to 75% of the plants grow from seeds in the soil.
Without soil: – In this method, farmers mainly use a mixture of cocopeat, perlite colorite and vermicompost inside a plastic tray. This method is best suited for nursery as it is easy and safe to transfer the plants from one place to another. Suitable moisture for the seed is maintained in cocopeat, due to which about 80% to 95% of the plants grow from seed. Root diseases are less in nursery as compared to soil in cocopeat mixture.
media …………………………………volume
1 cockpit……………………………… 60 to 70%
2 Perlite ………………………………10 to 15%
3 Colorrite ……………………………10 to 15%
4 vermi compost or cow dung ……10 to 15%
How to make Coconut Mixture for Plastic Trays?
The most important thing is to buy a good quality cocopet.
Keep the cocopet inside a bucket of water or a large vessel for 1 day so that the salt and other harmful substances present inside the cocopet are removed.
Take out the cocopee and dry it in the sun, after drying, filter it through a thick sieve.
We will use only fine cocopeat for nursery.
Mix perlite, colorite and vermicompost in cocopet.
Now we can use this mixer for nursery.
If perlite and colorite are not available in your area, then you can prepare nursery by using only cocopeat 80% and vermicompost 20%.
You can also create a nursery with only the help of cocopeat.
Because there are no nutrients in cocopeat, then we should give nutrients (DAP, urea potas) etc. to the nursery through spray by dissolving it in water.
Spray nutrients only when plants have two or three leaves or more.
In harsh weather, farmers can get nursery ready at a cost less than the Indo-Israel Project Center near them, get information related to Indo-Israel Center from the link given below.
https://centreofexcellenceforvegetable.webs.com/